Showing posts with label crafts.homemade. Show all posts

Tuesday, August 21, 2012

A Little Bit of Rustic and Whimsy


I know y'all have seen the faux taxidermy everywhere on the internet. I absolutely love it! However, West Elm, Anthropologie, etc. think it needs to cost at least $100. Well, that is way too much for my budget!
I really wanted a deer head or something or at least some horns to lay around for some rustic and whimsy touches....so I got to thinking about who I know that hunts. Erik's mom and stepdad pretty much have a zoo of dead animals in their house. It's actually pretty crazy how many animals they have hung on the walls, sitting on tables, draped over the couch...you get the idea. I figured they had to have some extra stuff laying around and turns out they did! Score!

My husband was surprised that I was wanting to add some dead animals to our decor, but it isn't in a "hey, we're hunters" kind of way...it's more of a modern way to add some rustic decor to your house. I know it sounds weird, but I promise it does!

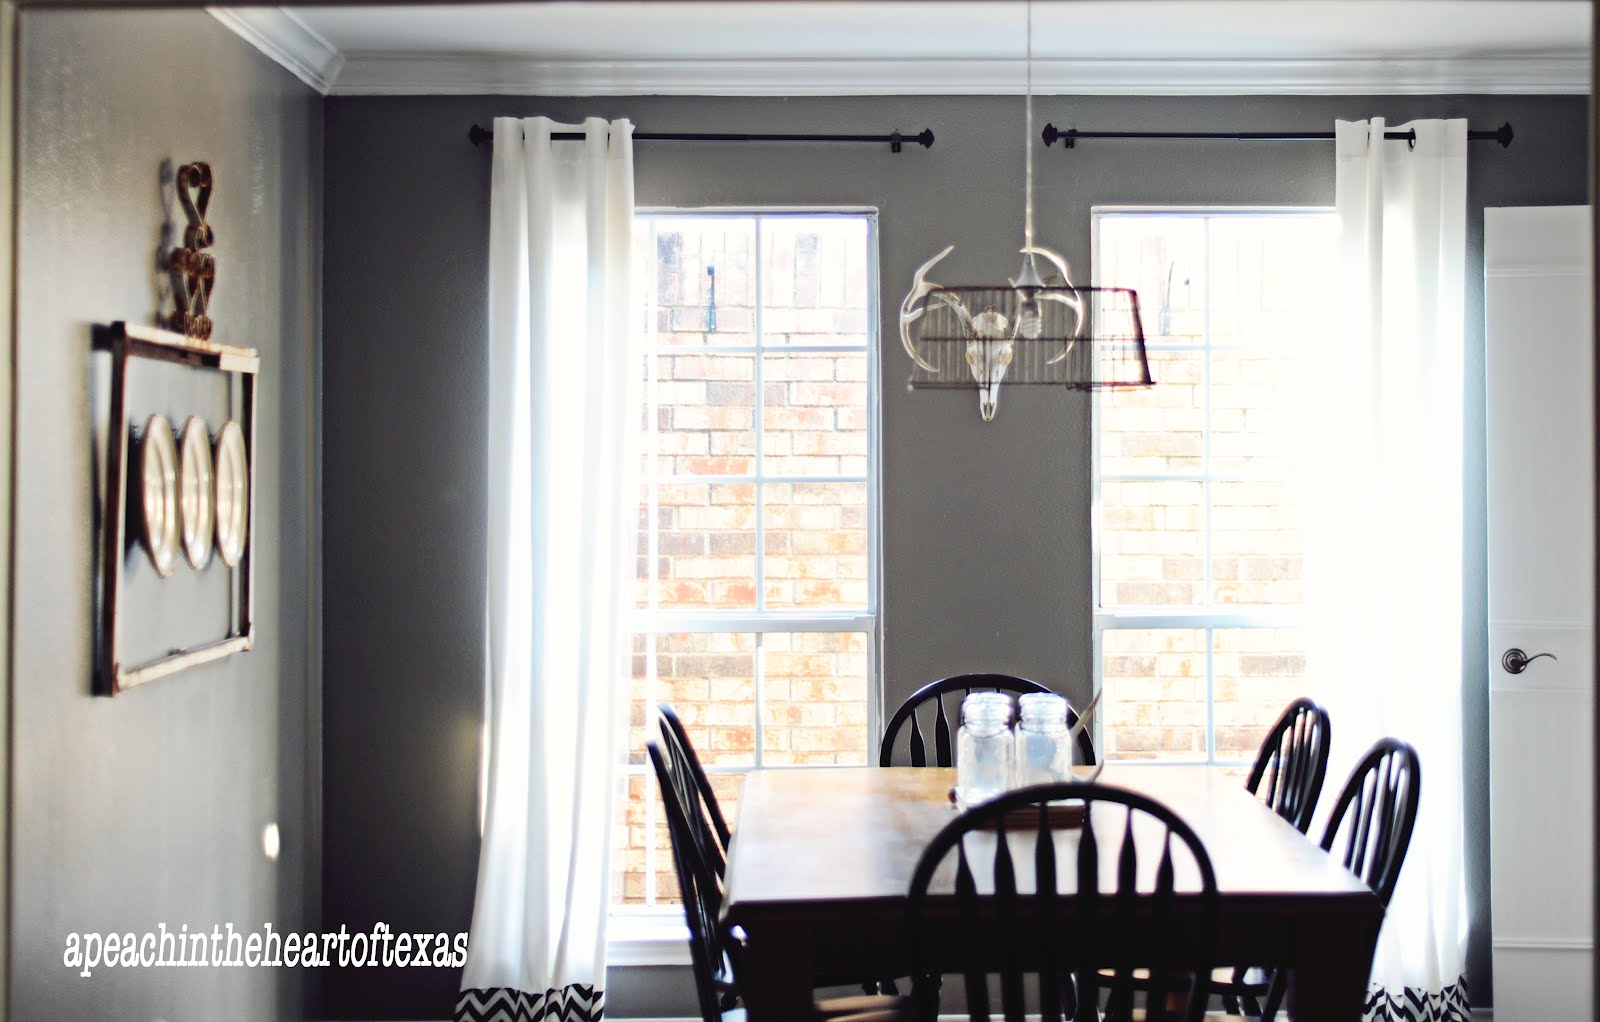
Here is what I got from them and how I displayed it...

Notice our new little friend in the dining room :) I didn't think I would want a skull and was thinking more of just mounted antlers, but I actually love this guy!

Besides, we live in Texas. It only seems natural to have this in our house!
Who knew mason jars could be adorned with antlers!
I love this little arrangement of this antique looking map, modern vase, and then the rustic antlers.

As you can see, my style is all over the place, but I think it somehow all works together well. At least it does to me. That's the beauty of decorating, you can do it however you want! I'm lucky to have a husband who trusts me :)

What do you think? Are you a fan of the taxidermy trend?


Thursday, August 16, 2012

DIY Classroom Style Pull Down Map

So there is a HUGE wall in our bedroom that I have been trying to figure out what to do with. It is the wall directly in front of our bed. I would love to have two wing-back chairs and a cute little table in between them on it, but of course the chairs I want are $$$ so that will have to wait a while or until I find something cheaper.

I still needed something to hang on the wall that would make a statement, but not be too busy. I am trying REALLY hard to keep the master bedroom simple and de-cluttered. I feel like the master bedroom should be a calming oasis that doesn't need to be filled with a lot of "stuff."

I stumbled upon this map and it was for sale on Amazon for like $2 and then $4 shipping or something crazy like that. So less than $7 and it is 24x36!! I was SOO excited and it matches our bedroom perfectly!

I didn't want to just frame it as I felt like it needed to be more unique than that....so why not make it look like a cool classroom pull down map?? I feel like there should be a better, shorter name for that, but I don't know what.

So here are the supplies I used for this fun and easy project:
-black spray paint
- 2 dowel rods (37 inches long each)
-velcro
-twine

I got all of the supplies at Home Depot and the total including the map was less than $30...I've seen these types of maps online for well over $100. Craaaaaaaay.

I used the velcro stickies to attach the map to the dowel rods, but I did put a couple of small nails in the wall under the bottom rod for more support.

So here's how it turned out:

I absolutely love how it turned out! I was in World Market today and they have tons of map stuff there...so maps are all the rage right now :)

This would be adorable if you got a colorful map and made one of these for a child's room or a play room.

I am sitting in my bed staring at it now :P

Tuesday, June 26, 2012

House Pictures

Long time no see!!
I have been so behind on blogging, but really I haven't had much to blog about.  I haven't been cooking as much like I normally do because we have been trying to eat better since we are going to Los Angeles in 2 weeks! Plus I have been getting the house done and decorated!  My mom came a few weeks ago and helped me finish up some stuff.  I also have been busy with photography which is a huge blessing!
So I got around to taking pictures of the house (well, the parts that I am happy with)...so here they are!
 
 
Here is the dining room.  We painted this room as it was a dark green that had to go!

 Curtains that my mom and I made when she was here....well, she mostly made them.  We bought the panels at Ikea and added the chevron border.
 LOVE this light fixture that my husband made!  Got the old shopping basket at a thrift store (thanks Melanie) for $10 and then bought a light kit at Lowe's.  My husband had to do some wire cutting to attach the kit to the basket.  I just love how vintage-y and modern it is!
 Love love my gallery wall! My mom and I hung the frames when she was here and then I made the pictures to go inside of them.  Two of them are fabric, the three black floral silhouette ones are from Ikea and the rest I made.
 Had to incorporate the two places Erik and I have lived together so far :)
 It was hard to see what this one said in the picture above....one of my favorite Bible verses.
 I am in love with that light!
 Family room :)
Per my husband's request, it is not near as "girly" as I used to decorate....and not near as much stuff around either, but I just like stuff...I am trying to be better!

 Love the vintage touches.
 Kitchen...it's hard to get a good picture of the whole thing since it's such a long space.
Took this one when the light wasn't as good so excuse the poor lighting.  I love cooking in this kitchen!
 Love my Kitchen Aid and chalkboard!
 Guest room...my mom and I made those pillows while she was here.
 Guest bathroom.  If we end up owning this place, those mirrors will be going...too old school for me, but fine for now!

 Fun bath art I made
 The master...I love how calming it is.


 I am not a fan of the tv being there, but it is nice when we want to lay in bed and watch Netflix or Hulu.  The people before us had a tv mounted there, but Erik bought a bigger one.

 {I forgot pictures of the master bath, but it's just a normal bathroom...double sinks, separate tub and shower, and then a walk-in closet.}

 This place is really feeling like home and we are in the process of making it a permanent home (for a while anyways)...so our fingers are crossed we get it!  I love this place!

I will post pictures of the outside one of these days.


Wednesday, May 30, 2012

Checking In

Hi there!! 
We have been busy busy over here!  Sorry for the lack of posting.
First of all, we have been eating salads and such these last couple of weeks...trying to get rid of some unwanted flab around the abdominal area :)...so I haven't had any yummy recipes to share with you!
Soon I will though because I am tired of eating like a rabbit!

And my mom came this last weekend and we got a lot done around the house!!  I love it when she visits because that woman gets things done!
We made curtain panels, made six pillows, made a gallery wall, decorated the guest bedroom, and bought 5 new lamps!  AND on top of that, she shined our floors and cleaned our windows.
Gotta love her!

Once I fill up the gallery wall with some art, I will post pictures of our casa.  I am loving how it is all turning out and I can't wait to share!

Here is a peek at just a few of the things my mom and I did together :)

My beloved chevron! This fabric was used for the curtain panels.


 Gallery wall! This is in the dining room! I can't wait to fill up all those frames!  Trying not to be so indecisive!

I painted this ampersand on a burlap pillow I had already made a few years back.

Sorry for the iPhone pics...I will take much better pictures when I am ready for the big reveal.
I know, the anticipation is just killing you isn't it??

Will be back soon!
Hope everyone is having a great week...

Tuesday, May 1, 2012

Cinco de Mayo Inspiration

We are having a little Cinco de Mayo party this weekend filled with delicious foods, tasty beverages, and of course dessert!

Of course what's a party without some festive decor?

Here are some of my favorites I found on you guessed it, Pinterest :)


Okay I just thought this was cute and if I had a pet gerbil, he would definitely be sporting this sombrero.  Not sure my dog would be down with it...
 Love this festive outfit...if only I could convince my husband that us throwing a Cinco de Mayo party is a good enough reason to go shopping....
 How cute is this cake??  Definitely way too challenging for me, but maybe one of you could whip this baby up!
 Love love love these cookies!!  I would love to make these!  This is a great way to bring in some decor while also having a delicious treat.
 How cute is that banner?  I have another banner idea up my sleeve I am planning on making...of course I'll post about it when/if I do make it :)
 This isn't decor, but maybe I should make these margaritas and get some of those fun stirrers to stick in there.  Tasty and decorative all in one!
Are you celebrating Cinco de Mayo?  It's just an excuse for us to have people over and hang out of course!  

Stay tuned for some pics from our party next week!

Tuesday, April 24, 2012

Chalkboard Labeled Canisters

The kitchen is one of my favorite places in the new house.  It has all of the upgrades I could dream of!
I wanted to add a few personal touches to it as well as some whimsy (the YUM letters I made I think were the perfect touch).  I was wanting to update the canisters we had as they were nothing special and I am pretty sure you have been able to buy them at Bed Bath and Beyond for the last ten years....so I was wanting something a little more unique.

I went to one of my favorite places...Hobby Lobby.  They had a lot to choose from, but I went with a more simple design since I knew I would be adding my own touch to them.

I know you can buy chalkboard labels (in fact, my friend bought me some and I have no clue where they went- sad!), but I wanted them at the same time as I bought the canisters and HL didn't have any....
I had to brainstorm a little bit and knew that they had the chalkboard wall decals.  So I bought one of those (it was 50% off too).

When I got home I cleaned the canisters and then found my decorative edge scissors and cut the decal into three rectangular shapes to size.

Here is what I came up with:

Nothing fancy, but just what I wanted :)

I think they are pretty darn cute!

House pictures will be debuting soon...just waiting on a couple of things to come in the mail :P

I think I overdue the smiley faces.  There are worse things I could do, right?

Tuesday, April 17, 2012

Zinc Style Letters

Have you all seen the lovely zinc letters from Anthropologie?
Well, they are drool worthy...but, they are around $18 and I wanted three.
Here is what they look like:
Nice huh?
The good news is is that you can replicate them for CHEAP!
Hobby Lobby sells cardboard letters and they also have metallic spray paint....
See where I'm going with this??

Here is what you'll need for your knockoff version:
-cardboard letters (mine were from Hobby Lobby and they were $2.47 each)
-Metallic spray paint (also from Hobby Lobby...around $5)
-sand paper

Preparation:
Lay some paper down and get to spray painting...remember to do light coats...I actually only did one coat and it was perfect.
For a more distressed, metal look I used some sand paper and lightly sanded them and it really made them look more like zinc.

These aren't the best pictures as it was nighttime and so the lighting wasn't great, but they really do look like metal in person and for all three of them and the spray paint it was about the same price as what one would cost at Anthropologie.

I originally had planned to do "eat", but Hobby Lobby was out of the "e" and "t" and I am a now person when I have my mind set on something, so I went with "yum."

I love it and it adds a nice modern touch to the kitchen!

What do you think? Is it worth buying the Anthro ones or do you like the cheaper knockoff version?


Related Posts Plugin for WordPress, Blogger...